Working with ZDefocus Node in Nuke 7
Part - I
The ZDefocus node is a major upgrade to the ZBlur node. The ZDefous node is used to blur an image according to the depth map channel and gives you ability to simulate blur using depth of field. This node splits the input image into layers. All pixels have the same depth value within a layer. Also, the whole layer receives same amount of blur size. After processing all the layers present in the input image, the ZDefocus blends layers together from back to the font of the image thus preserving the order of the elements in the scene.
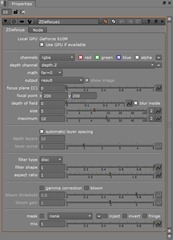
To add a ZDefocus node to the Node Graph panel, select the input image that you need to blur and then choose the Filterbutton to display the Filter menu. Next, choose ZDefocus from the menu; the ZDefocus# node will be inserted in the Node Graph panel. Also, The ZDefocus# node properties panel will be displayed with the ZDefocus tab chosen in the Properties Bin, refer to Figure art21-1.
 |
| Figure art21-1 |
You notice in the Node Graph panel that the apart from the regular mask and Output connectors, the ZDefocus# node has two more input connectors: filter and image. These are discussed next:
filter: This image connected to this input takes the shape of the out of focus highlights. These highlights are also referred to as “Bokeh”. You can use a Roto or Flare node to create the filter image. If you want to add color fringing to Bokeh, you can use also connect a color image to the filter input.
image: This input is used to connect to to the input image that you want to blur. Make sure that this image contains a depth channel.
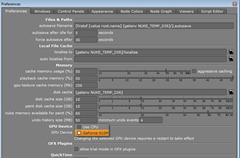
You will also notice a focal point widget in the Viewer# panel. This widget is used to adjust the position of the focal plane. On moving this widget, the focus plane and focal point parameters update automatically. If you select the Use GPU if available check box in the node properties panel, the processing of the node is run on the GPU instead of CPU. If GPU is present in the scene, its name will be displayed above the check box, refer to Figure art21-1. You can also select which GPU you need to use. To do so, open the Preferences dialog box by pressing SHIFT+S and then choose the desired option from the GPU Device drop-down of the GPU Device area, refer to Figure art21-2.
 |
| Figure art21-2 |
Before moving farther, navigate to http://www.mediafire.com/download/lpbg7sv7lf7hlz2/art021.zip and download the zip file. Next, extract the contents of the zip file to your hard drive. The zip file contains the chopper.exr file which we will used to explain the concepts here.
Step – 1
Lunch Nuke and start a new script in it.
Step – 2
Load the chopper.exr file into the script; the Read1 node will be inserted in the Node Graph panel.
Step – 3
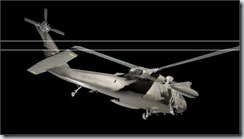
Make sure the Read1 node is selected and then press 1 to view its output in the Viewer1 panel, refer to Figure art21-3.
Step – 4
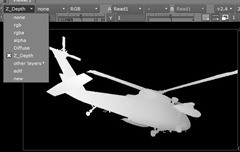
Select Z_Depth from the Channel Sets drop-down; the depth channel will be displayed in the Viewer1 panel, refer to Figure art21-4. Now, select rgba from the Channel Sets drop-down.
 |
| Figure art21-3 |
 |
| Figure art21-4 |
Step – 5
Connect a ZDefocus node to the Read1 node. You will notice an error message in the Viewer1 panel about the missing depth channel. This error is generated because by default the ZDefocus node looks for depth information in the depth.z channel which is selected by default in the depth channel drop-down.
Step – 6
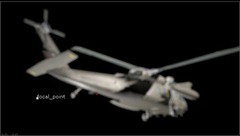
Select Z_Depth.red from the depth channel drop-down; you will notice blur in the Viewer1 panel, refer to Figure art21-5.
The options in the channels drop-down located above the depth channel drop-down are used to select channels on which the blur will be applied.
Step – 7
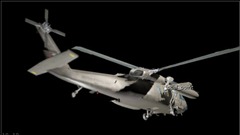
In the Viewer1 panel, move the focal point widget to the front part of the chopper; the area around the point will be in focus immediately, refer to Figure art21-6.
 |
| Figure art21-5 |
 |
| Figure art21-6 |
Step – 8
Select depth from the math drop-down.
The options in math drop-down are used to specify the method that will be used to calculate the distance between the camera and the object using the information available in the depth channel. If you hove the mouse pointer over the math drop-down, a tooltip will appear with information about the formula used to calculate the blur. By default, the far=0 option is selected in this drop-down. This option is compatible with the depth maps generated using Nuke and RenderMan.
Step – 9
Enter 0.1, 8, and 10 in the depth of field, size, and maximum fields, respectively.
The depth of field parameter is used to specify the depth of field around the focus plane. The size parameter is used to set the size of the blur. The size of the blur is clipped at the value specified using the maximum parameter. The blur inside check box located next to the depth of field parameter is used to apply a small amount to the in focus area so that the transition between the in focus and out of focus areas look smooth.
Step – 10
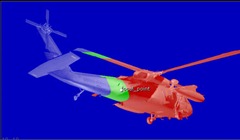
Select the focal plane setup from the output drop-down; the depth of field information will be displayed in the rgb channels in the Viewer1 panel. Move the focal point to see the output properly, refer to Figure art21-7.
The red color represents the area (less than DOF) that is in focus. The green color represents the area that is inside DOF. If depth of parameter is set to 0, you wont be able to see green area in the viewport. The blue color represents the area that is greater than DOF.
Step – 11
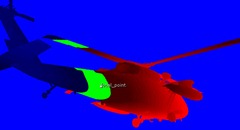
Select the layer setup option from the output drop-down.
This option is similar to the focal plane setup option but it displays the DOF information after the depth is divided into layers, refer to Figure art21-8. When the automatic layer spacing check box is selected, the ZDefocus node automatically decides how many depth layers to be used based on the value specified by the maximum parameter. When you clear this check box, you can use the depth layers and layer curve parameters to control the numbers of layers and spacing between the layers, respectively.
 |
| Figure art21-7 |
 |
| Figure art21-8 |
Now, experiment with the controls in the ZDefous1 node properties panel until you get the desired result. Also, use the focal point widget in the Viewer1 panel to interactively change the focus point.
This concludes the part – 1.
Part - II
In continuation with the Part - 1 of this article, we will work with the remaining options available in the ZDefocus node properties panel.
Step - 1
Navigate to the following link and then download the image with the name city_illumination.jpg on your hardd drive.
Step – 2
Load the city_illumination.jpg file into the script; the Read1 node will be inserted in the Node Graph panel.
Step – 3
Make sure the Read1 node is selected and then press 1 to view its output in the Viewer1 panel, refer to Figure art22-1.
 |
| Figure art22-1 |
Step - 4
Connect a ZDefocus node to the Read1 node. You will notice an error message in the Viewer1 panel about the missing depth channel. This error is generated because by default the ZDefocus node looks for depth information in the depth.z channel which is selected by default in the depth channel drop-down and there is no depth channel available in the city_illumination.jpg file.
Step - 5
In the ZDefocus tab of the ZDefocus node properties panel, select rgba.alpha from the depth channel drop-down; an error message will be displayed in the Viewer1 panel about missing alpha channel.
Step - 6
In the Read1 node properties panel, select the auto alpha check box. You will notice in the Viewer1 panel that highlights are now out of focus, as shown in Figure art22-2.
 |
| Figure art22-2 |
By default, the disc option is selected in the filter type drop-down. As a result, a round disc filter will be applied to the image. The filter shape parameter is used to dissolve the shape between 0 (gaussian, blobby shape) to 1(disc) range.
Step - 7
Enter 2 in the aspect ratio field. You will notice the cat's eye type effect in the Viewer1 panel, as shown in Figure art22-3.
 |
| Figure art22-3 |
The aspect ratio parameter controls the aspect ratio of the filter. The default ratio is 1:1.
Step - 8
Enter 1 in the aspect ratio field. Next, select bladed from the filter type drop-down; the highlights in the Viewer1 panel will displayed in shape of iris blades, as shown in Figure art22-4.
 |
| Figure art22-4 |
Step - 9
Enter 3 in the bladed field; the highlights in the Viewer1 panel will display in the shape which is made of 3 iris blades, as shown in Figure art22-5.
 |
| Figure art22-5 |
The roundness parameter is used control the rounding of the polygon edges of the filter. If you set zero value for this parameter, no rounding will occur. The rotation parameter is used to define the rotation of the filter in degrees. The inner size parameter is used to control the size of the inner polygon. The inner feather parameter is used to add feathering around the outward and inward edges of the inner polygon. The inner brightness controls the brightness of the inner polygon. Adjust these parameter as per your requirement.
Step - 10
Select the catadioptric check box. This check box is used to produce annular defocused areas thus producing the donut-shaped highlights. The catadioptric parameter is used to control the catadioptric hole in the bokeh. This parameter will only be available, if you select the catadioptric check box. Figure art22-6 shows the bokeh created using the following values:
filter type: bladed
aspect ratio: 1.04
blades: 7
roundness: 0
roatation: 66
inner size: 0.105
inner feather: 0.285
inner brightness: 0.07
catadioptric: Selected
catadioptric size: 0.41
 |
| Figure art22-6 |
Step - 11
Select the gamma correction check box; a gamma curve of 2.2 will be applied on the image before blurring and then reversed for the final result. This will make the bokeh more pronounced, as shown in Figure art22-7.
 |
| Figure art22-7 |
Step - 12
Check the bloom check box to make the highlights more visible. When you select the check box, the bloom threshold andbloom gain parameters will become active. The highlights above the value specified by the bloom threshold value will be multiplied with the values specified for the bloom gain parameter.
Step - 13
Enter 0.88 and 2.44 in the bloom threshold and bloom gain parameters, respectively. Figure art22-8 shows the highlights after entering the value.
 |
| Figure art22-8 |
If you select filter shape setup from the output drop-down, the filter shape which is responsible for the shape of the highlights will be displayed in the Viewer1 panel, as shown in Figure art22-9.
 |
| Figure art22-9 |
Step - 14
Select bladed from the filter type drop-down and then adjust the parameter corresponding to bladed filter type. You will notice the change in the shape in the Viewer1 panel.
Next, you will apply a custom filter to the ZDefocus node. You can create a filter image using a Flare or Roto node.
Step - 15
Rest the ZDefocus node properties. Next, select rgba.alpha from the depth channel drop-down.
Step - 16
Click on the empty area of the Node Graph panel and then add Constant node. Next, set its size to 255x255. The addedConstant1 node will act as a place holder for the Flare node.
Step - 17
Make sure the Constant1 node is selected in the Node Graph panel and then connect a Flare node with it. Next, press 1 to view the output of the Flare1 node in the Viewer1 panel.
Step - 18
In the Viewer1 panel, use the position widget to position the flare at the center of the Constant node's result.
Step - 19
In the Flare tab of the Flare1 node properties panel, enter 16 and 1 in the edge flattening and corner sharpness parameters, respectively.
Step - 20
Connect the filter input of the ZDefocus1 node with the Flare1 node.
Step - 21
Select the ZDefocus1 node and then press 1 to view its output.
Step - 22
In the ZDefocus1 node properties panel, select image from the filter type drop-down; an error message will be displayed in theViewer1 panel because the filter image has no alpha channel embedded in it. To rectify it, select rgba.red from the filter channel drop-down.
You will notice in the Viewer1 panel that the shape of the highlights is changed according to the output of the Flare1 node.
This concludes part - 2 of "Working with ZDefocus node".
This tutoral is taken from my Nuke Book published by CADCIM Technologies.
 - over 1,000 free tools for The Foundry's Nuke