 - over 1,000 free tools for The Foundry's Nuke
Create motion blur effect using the motion vector pass
In this tutorial, you will create motion blur effect using the motion vector pass rendered from Maya and VectorBlur node. Figure 1 shows the input image and motion blur effect applied to an element in the scene.

Figure-1
Step –1
Navigate to http://www.mediafire.com/?k5288w91eeo16 and download file to your hard drive. Next, extract the contents of the file. The zip file contains footage used in this tutorial.
Step –2
Start a new script file in Nuke. In the Properties Settings panel set the HD format (1280x720 px).
Step –3
Read in the mv_MasterBeauty and mv_mv2DToxik EXR image sequences; the Read1 and Read2 nodes are inserted in the Node Graph panel.
Step –4
Click on an empty area of the Node Graph panel to deselect the selected nodes, if any.
Step –5
Choose the Channel button from the Nodes toolbar; the Channel menu is displayed. Next, choose ShuffleCopy from the menu; the ShuffleCopy1 node is inserted in the Node Graph panel.
Step –6
Press and hold the left mouse button on the 1 input of the ShuffleCopy1 node and then drag the cursor to the Read2 node in the Node Graph panel; a connection is established between the ShuffleCopy1 and Read2 nodes.
Step –7
Press and hold the left mouse button on the 2 input and then drag the cursor to the Read1 node; a connection is established between the ShuffleCopy1 and Read1 nodes, refer to Figure 2. Next, select the ShuffleCopy1 node and then press 1 to view the output of the ShuffleCopy1 node in the Viewer1 panel.
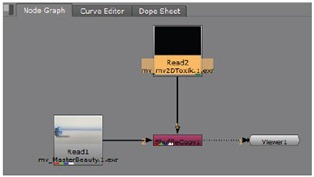
Figure-2
Step –8
In the ShuffleCopy tab of the ShuffleCopy1 node properties panel, select MV2E_mv2DToxik_persp from the 1 in drop-down.
Step –9
Select other layers > motion from the out2 drop-down, refer to Figure 3.

Figure-3
Step –10
In the ShuffleCopy tab of the ShuffleCopy1 node properties panel, select the check boxes, as shown in Figure 3.
Step –11
Select the ShuffleCopy1 node in the Node Graph panel and then choose the Filter button from the Nodes toolbar; the Filter menu is displayed. Next, choose VectorBlur from the menu; the VectorBlur1 node is inserted between the ShuffleCopy1 and Viewer1 nodes.
Step –12
In the VectorBlur tab of the VectorBlur1 node properties panel, select motion from the uv channels drop-down.
Step –13
Enter 0.5 in the multiply field.
Step –14
Scrub in the timeline to preview the motion blur effect.
Step –15
Choose File > Save from the menu bar to save the script.
This tutorial I have taken from my Nuke Book, "The Foundry Nuke 7 for Compositors".
Comments
Using the "backwards" method and not identifying the alpha channel will often get strange results.
RSS feed for comments to this post