Use of expressions to modify animation curves
Timing changes can be quite a headache in most compositing packages.
Here's a few cases where the use of expressions can be of great help when dealing with time modifiers (frame holds, time offsets, time warps…)
1- Freezing an animation to a certain frame (FrameHold)
The syntax curve(frame) is one of the simplest and yet most useful ways to handle time within an expression. It means "take the value of this animation (curve), at this frame".
This can be used on any animated knob, but it's most useful on 3d operators, since one cannot simply attach a FrameHold node to them (yet).
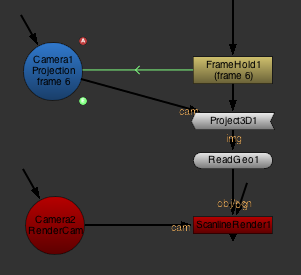
Here's a very common scenario: you have a plate and a matchmoved camera and want to set up a projection based on a still frame from the plate. You can either make a copy of your camera and delete its animation to make it static at the frame of your choice, or use an expression to dynamically freeze the camera's animation based on a separate FrameHold, which you can later change if you wish to choose a different frame for your projection.

 The above setup can be easily accomplished by using the following expression in any animated knob in the projection camera:
The same expression can be used in the label of the projection camera to show the frame being used at all times. Like this:
![]()
- Offseting an animation in time (TimeOffset)
This works almost identically to the previous case.
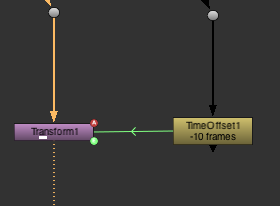
Let's say you have a camera that matches your plate. Now, in your comp, you're offsetting that plate in time.
You can still dynamically reference the animation of the camera by using a curve(frame+offset) expression.
Like this:


- Retiming an animation (TimeWarp, OFlow, F_Kronos)
Again, using the same expression syntax, a retime curve can also be referenced so your animation is retimed the same way your footage is.
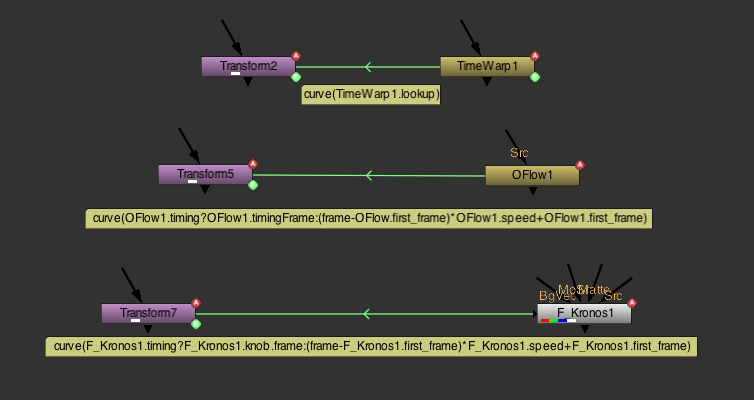
Here's an example using the retime data from a Timewarp node to retime the animation of a Transform node:

If you're using a OFlow or F_Kronos, you'll have to reference the "timingFrame" and "frame" knobs respectively, instead of the lookup knob.
Additionally, OFlow and F_Kronos can use two different methods to describe a retime: a lookup curve (source frame) or an overall speed.
If you want your expression to work correctly regardless of the method used, you could include a condition so it handles both methods. This way you can work on your OFlow or F_Kronos as you like, and make sure your animation curves carry those changes live.
Here's how the expressions would look like for all three kind of nodes:

- Inverting a retime curve (undoing a retime using the "inverse" expression)
Say you have a retime curve you need to get the inverse of. For example, you animated (or tracked) something to an already retimed plate, and now that retime has changed. Ideally, you'd want to un-apply the first retime from your curve, and then apply the new one.
There's at least 2 ways in which you could approach this:
- Take the old retime curve, and invert it in the Curve Editor by doing Edit->Move… and then switch the x and y values of the curve. From here, you can apply this "inverted" curve to your animation curve as described in "Retiming an animation"
- Use the built in "inverse" expression method. This is ideal if you're still making changes to the original curve. However, keep in mind the "inverse" method will only work on curves that have a positive derivative everywhere. In other words, it only works with curves/retimes where the frame number only increases (ie., no backwards retime, ping-pongs, or anything where the frame number decreases with time)
To use the inverse method, just use curve.inverse, or nodename.knobname.inverse, where nodename.knobname contains an animation curve. Like this:

- Finding the slope/speed of a curve at a certain point (derivative expression)
The derivative expression can be very handy for motion graphics, or in any scenario where you'd like to animate something depending on the "speed" of an animated curve.
Imagine you have a retime curve and you want to do some creative grading as your clip slows down/speeds up. Or, you have tracked an object (a magic wand, for example), and want it to get brighter the faster it moves. Or, you're animating a wheel, and want it to rotate faster the faster it moves across the screen. You get the picture. In all of these cases, the derivative expression can be of great help.
How to use it:
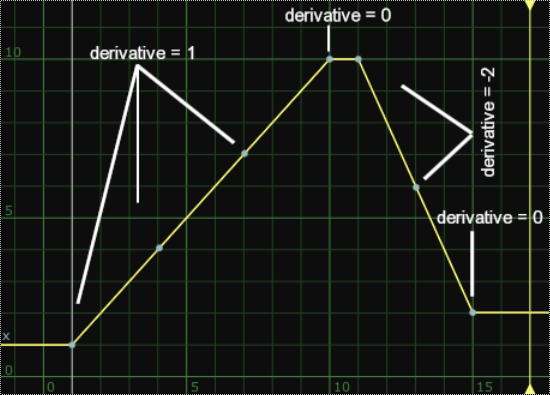
The syntax is curve.derivative, and it will return the first derivative of that curve at the current frame. That is, how much do the values in the current curve change between the current frame and the next. This illustration explains it better:

So, by using the expression curve.derivative on the above curve, you get 1 for frames 1 to 9, 0 on frame 10, -2 on frames 11 to 14, and then 0 again on frame 15.
It is then up to you to use those values on any other knob, and modify them as needed (normalize them, scale them...) so they're suited for your purpose (rotation, color correction,...).
The derivative expression can take 2 optional values, with the one of the following syntaxes:
- curve.derivative(frame)
- curve.derivative(n, frame)
- frame is the frame we're calculating the derivative for. Default is the current frame. You could use something like curve.derivative(1,frame-5) to get the first derivative of this curve with a delay of 5 frames, for example.
- n represents the nth derivative. The default is one (for first derivative), but you can set it to 2 to return the second derivative. The second derivative can be described as the derivative of the first derivative. A good analogy of what that means is: on a moving car, the first derivative would be its change in position along time (=speed), and the second derivative would be the change in speed along time (=acceleration). So, if you want to animate something to the acceleration of an object instead of its speed, try the second derivative.
- Finding the average of a curve (integrate expression)
The integrate of a curve between points A and B is usually described as the area below that curve for that slice (A to B). Integration is also often used to find the average value of a function (curve) between two points. This can come in quite handy for complex curves, so let's see how we can use it in Nuke to get the average value of a curve between two frames:
Say you have a curve that produces a flickering effect. Something like this:

Now you want to know the average value of that curve between frames 0 and 100. You can do so using an expression with the following syntax:
curve.integrate(first frame, last frame)/(number of frames)
This would calculate the integrate of a curve between 'first frame' and 'last frame'. The result would be the aggregate of values between the 2 specified frames, or the area below that slice of the curve. So, dividing that by the total number of frames, we get the average value. Using the above curve as an example, the expression field would look like this:
![]()