Interview with Onyx
ONYX AI Matte – Interview with Evgeniy Shatskiy & Alexey Azarov
Background and collaboration
Could you each introduce yourselves and explain what you brought to ONYX from your respective backgrounds in compositing, product development, and engineering?
Evgeniy:
For me, ONYX was above all a chance to do something new. Editing and compositing work had been drying up, while I had always enjoyed programming. I started with Python, then moved into C++ and C#. I chose C++ for ONYX deliberately: it is closer to the hardware and a better fit for this kind of integration. When I saw Alexey's Python prototype, I immediately thought it could become a proper working tool.
Alexey:
I came to ONYX from compositing, from working on actual shots every day. Evgeniy and I are both artists, but at some point our paths diverged. I stayed close to shots, masks, and the use of neural-network tools in production, while Evgeniy went deeper into programming and engineering.

We look at the same tool from different sides. I immediately test it against a real shot: how quickly can I get a result, can I control it, and what do I do when the automation gets something wrong? Evgeniy is thinking about architecture, speed, and stability. Then we argue, challenge each other's assumptions, and look for an answer that survives both tests.
The first Python version convinced me the idea worked. I had never produced masks of that quality that quickly. Trying to give the plugin to someone else was the reality check. A prototype that works on your own machine and a product other people can install are two very different things. That was the point where Evgeniy's engineering experience became essential.
The problem that started it
What production problem made you decide to build ONYX together?
How did Alexey's initial Python MVP become the starting point for Evgeniy's C++ engineering work?
Evgeniy:
We wanted to remove one of the most tedious parts of compositing: finding an object, carrying it through the shot, then hunting for every place where the mask drifted, trembled, or picked up the background. A nice result on one frame was not enough. We needed a process that could survive the whole shot, let you fix a mistake, and then get on with the comp.
Alexey built the first Python MVP and proved the core idea. I took it from there toward a full C++ product. That was when we found out the model was only one part of the job. It also needed caching, corrections, memory management, and, above all, predictable behavior inside Nuke.
Alexey is the right person to explain what triggered the original MVP – it was his idea. What caught my attention was the chance to connect a powerful SAM3-based engine to software we use every day. It was not abstract technology; it could improve our own workflow.
Alexey:
There was no single shot that made me decide to build a plugin. The same problem just kept coming back. First came SAM, then SAM2, and ComfyUI was still the only place where I had enough control to experiment properly. Roto Brush in After Effects, Mask ML, and other tools already existed, but each came with its own limits. Sometimes fighting those limits was more annoying than doing the work by hand.
ComfyUI quickly led me further down the stack: Linux, Python, the way the models work, and different ways to connect them. It opened a huge world, and I started building my own experiments instead of only running ready-made workflows.
ComfyUI was a great laboratory. I could take the process apart node by node, swap a model, and see what changed. But every production shot still meant preparing the material and rebuilding the environment around it. That is fine for an experiment; it is a lot of overhead for daily production.
By the time SAM3 arrived, it was obvious that the main stages of mask work could move into the production pipeline itself. No more constant trips to ComfyUI, huge graphs, separate video or sequence preparation, and the same memory limits every time.
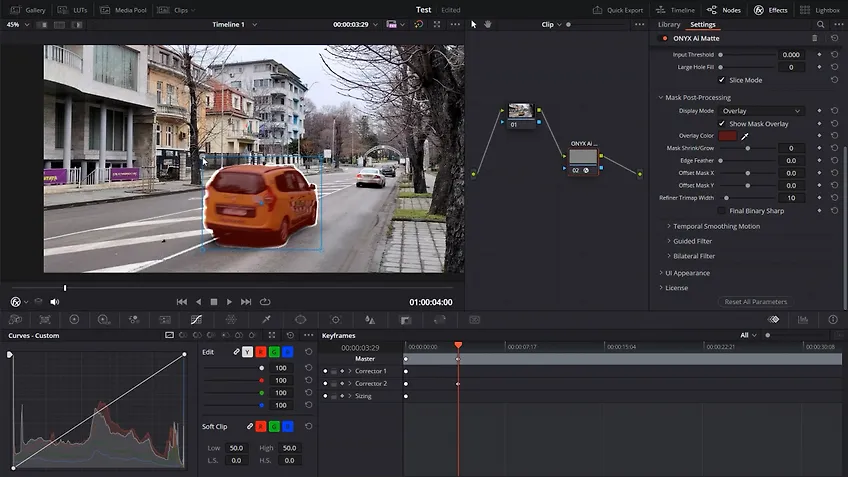
Once I understood how SAM3 and the ViTMatte refiner behaved, I realized many of those memory limits could be worked around. In roughly two weeks I had the first Nuke plugin, with its own interface and my own optimizations. That was the real turning point. I had never made masks that fast, with that level of quality, before.
After that I kept improving and adapting it. The trouble started as soon as other people tried to install it: Python environments, libraries, and drivers did not match. Even a very detailed guide could not cover every combination of hardware and software where something might break.
That was when I knew the next step had to be OFX. The experiment needed to become a product. Evgeniy and I were already working closely by then, so at the start of the new year I closed the old repository and we began developing ONYX AI Matte together.
How you work together today
How do you divide responsibilities and make product decisions today?
Where do an artist's production needs and an engineer's priorities reinforce each other, and where do they sometimes conflict?
Evgeniy:
Alexey defines the problem from the shot's point of view and checks the result in real compositing work. I handle the C++ engine, performance, stability, and the engineering implementation. We also have a group of testers who use ONYX in production and tell us very directly what is missing. Alexey and I discuss those requests together. There is no straight line where one person writes requirements and the other quietly writes code. Technical limits change the workflow, and an artist's experience keeps reshuffling the engineering priorities.
Quite a few controls came directly from testers. The clearest example is Go to Init Frame, which we discuss in Q11. Small changes like that accumulate, and they are often what make a tool comfortable to use.
We keep bringing the discussion back to two things: does this save time on a real shot, and can we make it reliable on an ordinary workstation? ONYX became a product at that intersection.
Alexey:
At first I insisted on a separate interface, like the one in my Python version. It was built around SAM3, while the refiner lived in a separate node with a lot of controls. I could tune the edge and memory use in detail – exactly what I had been missing in similar tools. That version also used noticeably less VRAM.
When we moved to OFX, Evgeniy and I argued about the interface for a long time. I wanted a separate window, something like Neat Video. He wanted everything in the host's native overlay.
In the end I agreed with him, and I am glad I did. The artist does not have another window to open or another interface to jump into. The main work happens directly over the frame, inside the application that is already open.
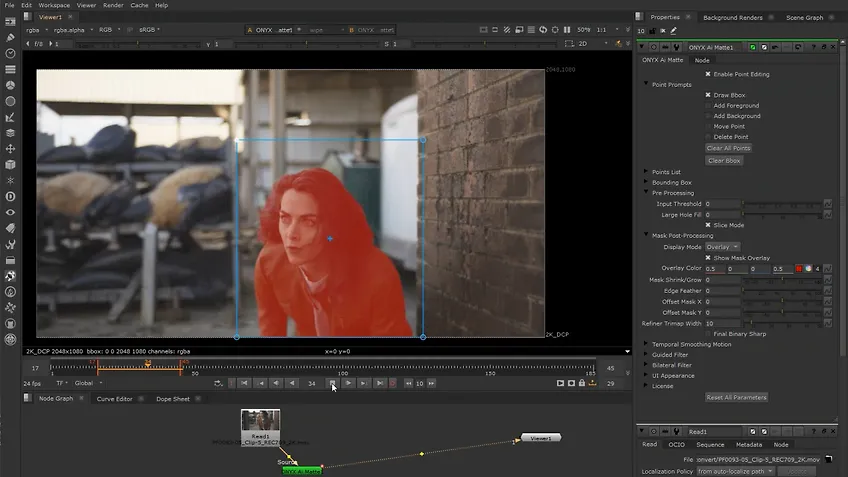
There is a ceiling, though. More advanced features may outgrow OFX and the interfaces individual hosts expose, in which case we will need our own application. We know that. For the current plugin, however, the native overlay was the more practical choice.
That story is a good example of how we work. Neither my idea nor Evgeniy's wins by default. We argue, test it against the actual constraints, and keep the version that works better on a shot.
SAM3, ONNX, and consumer GPUs
Evgeniy, without going into proprietary architecture, what were the main engineering challenges in adapting the SAM3 models for consumer GPUs and optimizing them with ONNX?
Evgeniy:
The main challenge was memory. The models are heavy, and fitting them into 6GB of VRAM without losing stability was difficult. We got them running reliably within that budget on weaker GPUs. Faster cards perform better because we no longer have to squeeze memory quite so hard.
The other challenge was adapting the models to our pipeline. It is a long chain, and accuracy matters at every step. Connecting all the components without losing quality between them became a substantial engineering problem of its own.
What "edge" means
From both the artist's and the engineer's perspective, what makes ONYX different from tools focused mainly on segmentation?
Where does it fit alongside tools such as Foundry's SmartRoto?
Alexey:
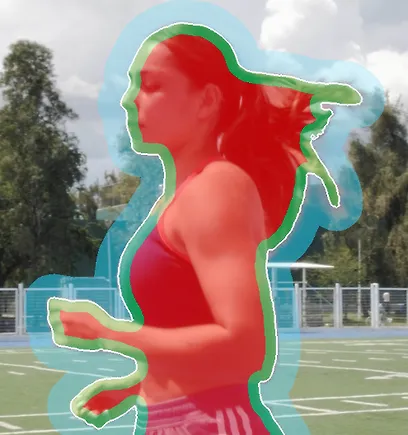
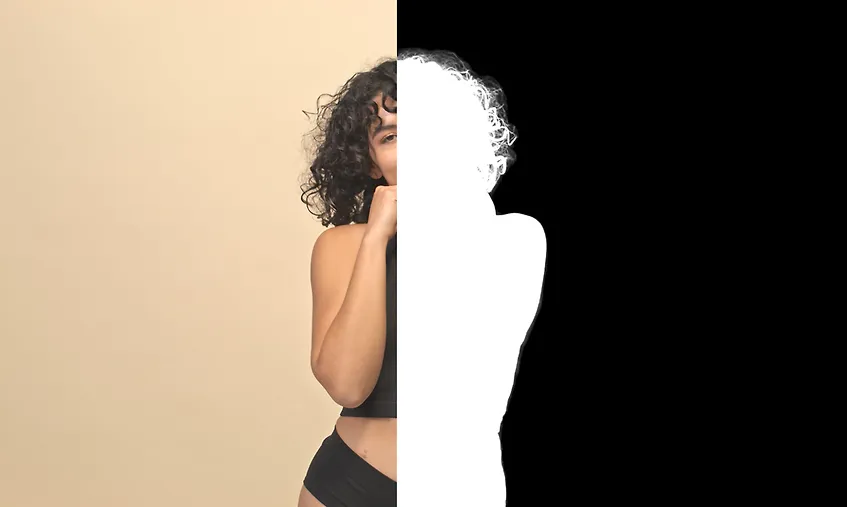
In my first segmentation experiments, it felt as if the problem was almost solved: point to an object, get a mask, and on one frame it could look convincing. Put that object over a different background, though, and the gap was obvious. Finding the object and producing a production-ready edge are two different jobs.
Fine hair disappeared, motion blur became a hard cut, and semi-transparent areas either vanished or turned opaque. Even a geometrically accurate mask could give itself away after the merge because the spill, grain, or focus did not match the new background.
Some of that can pass unnoticed on a still frame. Start playback or change the background slightly and the edge begins to move as if it does not belong to the object. For a compositor, that is the real test, not how attractive the alpha looks in a separate viewer.
Compositing does not always need a perfect mask of the whole object anyway. More often than people think, what you need is a “dirty” utility mask for one operation. After a chroma key, for example, I may only need the actor's skin so I can apply despill there without drawing the area by hand. ONYX is very useful for that kind of work.
Another practical observation is that SAM3 behaves better when you give it one coherent region – a single subject or material. Ask for a person and it looks for a person. A backpack, bag, or another item worn by that person is still a separate object to the model. Force several different things into one selection and the result often starts to drift.
That led to several selection modes in ONYX. You can ask the model to include more of what belongs with the person, or go the other way and point to the exact region you want. We found many small behaviors like this while studying SAM3. Over time, they became real controls in the plugin.
I eventually separated the process into distinct jobs. Segmentation tells us that we found the right object or region. Matting restores partial alpha in hair, motion blur, defocus, glass, and similar areas. The final edge can only be judged in the shot, after the merge and in motion.
That is also how ONYX came to be structured: first find the object and carry it through the shot, then deal with the pixel edge separately. The refiner is not tied to a mask produced by ONYX. Refiner Direct can take existing roto or the output of another tool.
Evgeniy:
SmartRoto and ONYX are not direct replacements. SmartRoto keeps the classic roto logic: the artist builds spline shapes and AI helps carry them between the right states. ONYX can pick up that result through Refiner Direct and work on the pixel edge. In simple terms, SmartRoto decides where the shape moves; ONYX helps decide what the final edge looks like. Both approaches are useful in production.
This started as a big experiment for us. SmartRoto and similar products solve their particular problem; we took another route, pairing the object mask with a separate refinement stage from the start. People now tell us they use the plugin every day, so the direction clearly proved useful.
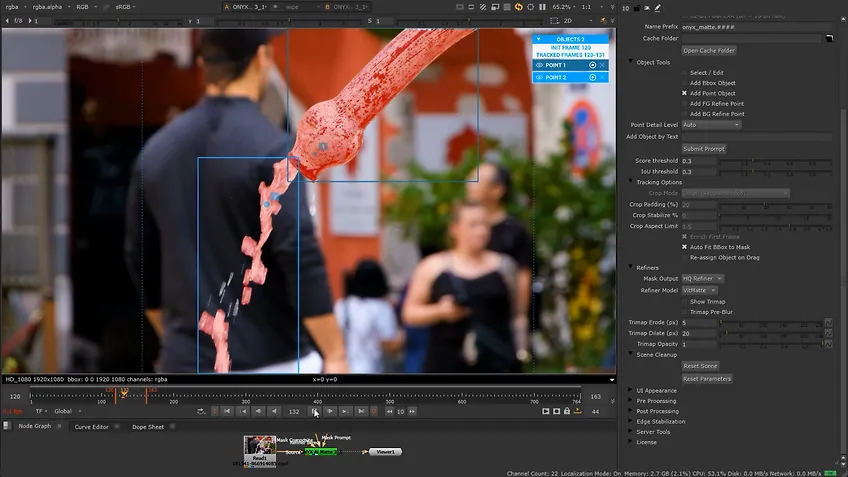
The structure itself is simple. First the pipeline finds the object and builds a mask; then the refiner brings the edge to usable quality. We separated those stages on purpose. Segmentation may find the object perfectly and still cut hair or semi-transparency badly. Because the refiner stands on its own, it can accept any tracked mask – from Mocha, regular roto, or another source – and deal only with the edge.
Where automation stops
Hair, fur, motion blur, semi-transparency, and edges affected by spill or background contamination are difficult for both the model and the artist.
Which problems proved hardest from the product and engineering sides, and where should users still expect to intervene manually?
Evgeniy:
There is no magic in ONYX. Hair, fur, motion blur, semi-transparency, and difficult edges tend to hold up well in fast movement because small distortions are hard to read there. On static material, the opposite can happen: the edge trembles. The refiners do not yet have temporal memory between frames, so that flicker is easier to see in a shot with little movement. This is why we talk about a fast way through the first 60–80% of the work, not an automatic finish for every shot.
That first 60–80% used to contain most of the routine. Now the artist starts from a good base and decides where to add a holdout, where to use the refiner, and where a small manual shape is simply faster.
From the engineering side, the hardest part is how tightly connected the system is. Add a feature or fix one area and a bug may appear somewhere else. Touch one connection and you have to check everything attached to it. There is no shortcut around that.
Alexey:
ONYX cannot do everything. Sometimes drawing a mask by hand is faster and more reliable, and, strangely enough, that often means static objects for me. If the shape barely changes, I draw a regular shape, track it through the shot, and send the result to Refiner Direct. ONYX only needs to handle the edge.
The result is stable and easy to understand. I keep control of the mask's shape and movement without rebuilding a difficult pixel edge by hand. There is no point forcing segmentation to solve something ordinary roto can finish in a few minutes.
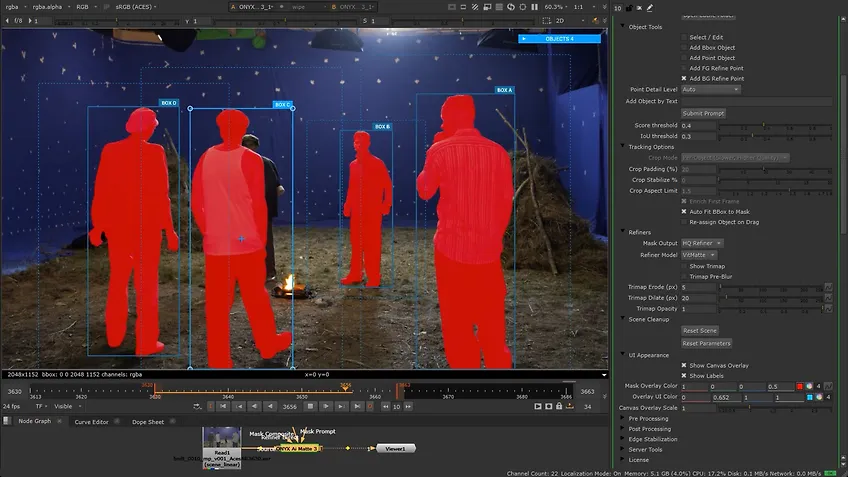
Another limit appears when there are too many objects. Put several unrelated parts into one selection and SAM3 begins to confuse them, lose the separation, and return unstable results. That is a model limitation we cannot remove yet, so one ONYX node currently supports up to 16 objects. If you need more, split the work across several nodes.
Artist intervention is not just repairing a bad mask. Sometimes the right decision is not to use automatic segmentation on that part of the frame at all. Build the stable foundation by hand and leave ONYX the work where it actually saves time: refinement and the final matte.
Best and worst shot types
Which kinds of shots give ONYX the strongest results today, and which remain difficult or unsuitable?
Do you evaluate those limits differently as a compositor and as a developer?
Evgeniy:
Large objects give the strongest results. SAM3 takes a 1008 × 1008 input, so we have to crop the frame. The original SAM3 implementation did not include that mechanism; we built it ourselves.
Small objects are the weak point. At that resolution, fine detail and small holes disappear. Objects that sit close together can also merge.
The model also misses individual flyaway hairs outside the main silhouette. That is something we are working on now.
Alexey:
I would not divide shots into “suitable” and “unsuitable” for ONYX. My rule here is the old one: divide and conquer. Do not try to pull everything out of the frame with one mask. As with traditional roto, break the shot into parts you can control.
It is easier for the artist to stay in control, and the model gets a clearer request. SAM3 handles one object or a region with shared properties better than a mixture of unrelated objects and materials. The model will thank you for it, so to speak. You can add, subtract, or intersect the masks later in the comp.
I treat hair as a separate task from the start rather than asking one mask to cover the person, clothing, accessories, and hair. Sometimes I add precise garbage masks to limit the search. When the task is set up properly, the hair comes out well.
Motion blur usually becomes difficult later, during refinement. Erode and dilate matter a lot there, and on a hard shot I may animate them. Sometimes I lower the working resolution and the refiner reads the blurred boundary better. It is no longer a one-button process, but it is still under control.
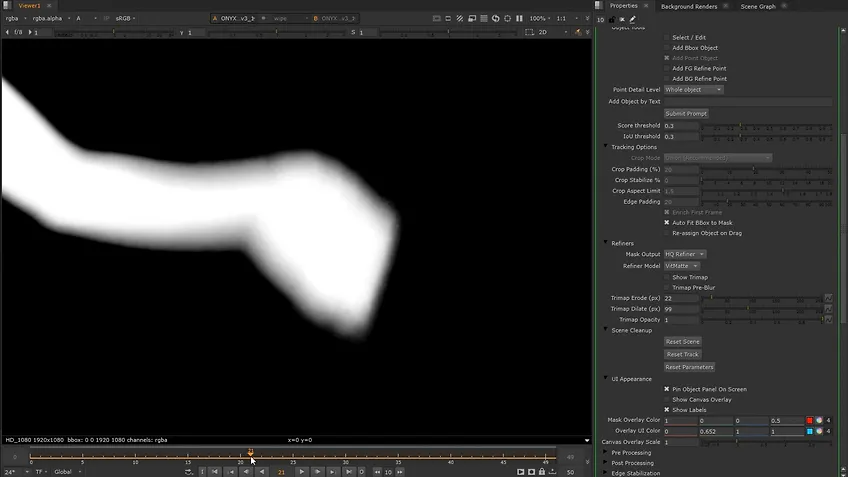
For a simple static object with clear geometry, I go straight to regular roto: draw the shape, track it, and use ONYX only for the edge. I see no reason to persuade segmentation to do something another tool can solve faster.
Keying has always worked like this. On one shot I have used as many as nine types of utility masks, from a rough garbage matte to separate masks for skin, despill, or motion-blur repair. An experienced compositor knows that “the object mask” is rarely one mask with one job.
The best results come when the artist does not hand ONYX the whole complicated frame at once, but decides in advance: this part is for segmentation, this part for the refiner, and this part for ordinary roto.
A typical Nuke workflow, both sides
Could you describe a typical ONYX workflow in Nuke from both sides: what the artist does, and what had to be built around the models to make that workflow reliable in production?
Alexey:
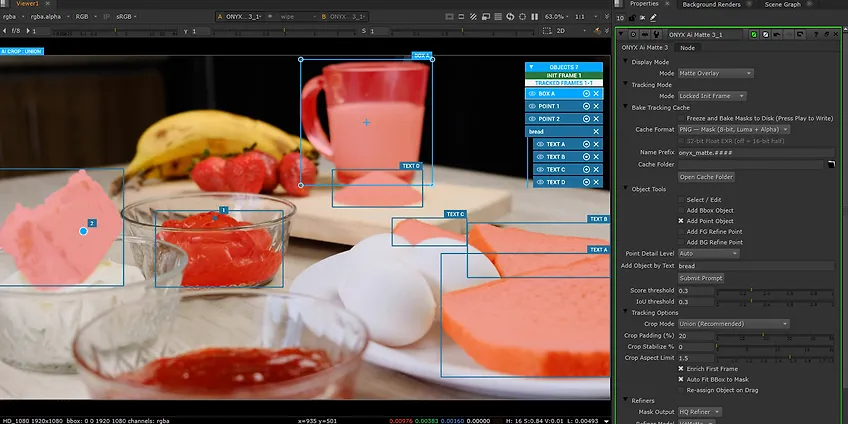
My workflow does not start by dropping ONYX into the node graph. It starts with a question: what does this shot actually need? A final mask for the whole object, separate hair, a holdout, skin for despill, a motion-blur region, or just a rough separation from the background?
The answer tells me how many masks I need and what each one is for. Only then do I choose whether to use ONYX segmentation and tracking, switch to ordinary roto, or feed an existing mask into Refiner Direct if the edge is the only remaining problem.
Usually I specify the object, carry it through the shot, and look for the frames where it failed. If part of the object disappears or the mask picks up the background, I add correction points only there. I leave the good tracking alone. Then I assemble the masks with add, subtract, and intersect, tune the refiner, check the result, and bake.
Difficult material may need crop, trimap, gamma, erode, and dilate adjustments, sometimes animated through the shot. Turning everything at random is pointless. You need to see which error each control is fixing.
There is no magic button yet. Installing the plugin, skipping the documentation, and expecting a perfect result is a bad strategy. ONYX opens up once you understand its components and inputs, and break the frame into tasks before you begin.
So it comes back to “divide and conquer”: understand the shot, decide which masks you need, and only then choose the tool for each one.
Evgeniy:
SAM3 was never designed for compositing. We had to build an adaptive layer around it that stays compatible with the hosts and still makes sense to a compositor. It translates in both directions: it tells the model what the compositor needs, then gives the compositor a familiar way to control it.
Fitting into a studio pipeline
How does ONYX fit into an existing studio roto and compositing pipeline?
Can it work with mattes created by artists or other tools, and what was required to make that interchange practical?
Evgeniy:
ONYX does not require a studio to throw away the tools already in its pipeline. Feed an animated mask from an artist or another system into Refiner Direct and ONYX skips segmentation and tracking. It works on the pixel edge instead.
It can sit after classic roto, SmartRoto, Silhouette, or a similar tool. The studio keeps editable spline shapes where they are needed, then ONYX handles hair, fur, semi-transparency, and the final matte further down the chain. After baking, the output is an ordinary file sequence.
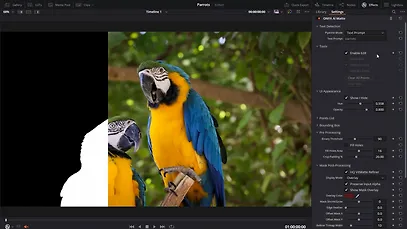
Host support for OFX is a separate headache. In Nuke, a plugin can access an arbitrary frame on the timeline. In DaVinci Resolve, OFX only exposes the frame under the playhead. That means some things we build in Nuke cannot be reproduced one-to-one in DaVinci. In our work, Nuke exposes more of the OFX functionality the plugin needs. We did not choose that difference; it comes from the host.
A lot of the engineering work is navigating those trade-offs and squeezing everything we can out of OFX. Some of our ideas simply do not fit inside it. We come back to that in the roadmap.
Alexey:
I use masks from Silhouette often, and the interchange has never been a problem for me. I build and track the shapes there, export them to Nuke, and connect them to the ONYX input the task needs.
If the shape and motion are already solved, there is no reason to repeat segmentation and tracking. The mask goes into Refiner Direct and ONYX handles motion blur, semi-transparency, and details a spline shape cannot represent well.
There is another option: run ONYX directly inside the standalone version of Silhouette as an OFX plugin. The host does not expose the full feature set, but the refiner and text prompt work. You can build the mask and process it right away without switching applications.
On my shots, the ONYX refiner has often produced a cleaner result that was easier to use in the comp than Silhouette's built-in refiner. That is my production experience, not a laboratory ranking. Motion blur, hair, and other edge types can behave differently, so I would always compare them on the actual material.
What I like is that no familiar tool has to be replaced. Silhouette keeps doing what it does well in shape building and tracking; ONYX joins the chain when a better edge is needed. It is another stage in the pipeline, not an attempt to replace the whole thing.
Local processing and hardware
Evgeniy, what did it take to make ONYX run locally on consumer hardware?
Alexey, how does local processing change the way you use it during a real shot?
Evgeniy:
The key was how we divided memory between the models. They cannot all fit at once, so we switch them and keep only what is needed at that moment. That is why 6GB of VRAM is enough, with peak use usually below 5GB. It was the hardest engineering decision in this area.
We also wanted to support the GTX 1080 Ti, but unfortunately that did not work out.
Alexey:
The main advantage of local processing is simple: I no longer have to send the material through an external workflow. With ComfyUI, I converted EXR footage to a PNG sequence, loaded it separately, set up the graph, generated the result, and brought it back into the comp.
In ONYX, I connect the original footage and select the object straight away. I stay in Nuke, see the mask in the context of the shot, and immediately know whether it works for the operation I need.
It saves more than conversion time. I do not lose context: the key, grade, despill, and the rest of the comp are still around me. I judge the mask where it will actually be used, not inside a separate test environment.
Fixing individual frames is especially convenient. Even if the result is already frozen, I can unfreeze it, correct one frame, and freeze it again. That file is overwritten; I do not have to repeat the whole preparation and import cycle.
There is no single “correct” workflow. Even our beta testers work differently: one finishes all the tracking first, another fixes problem areas immediately, and someone else has their own system for freeze and bake. We watch how people work and do not want to force everyone into one method.
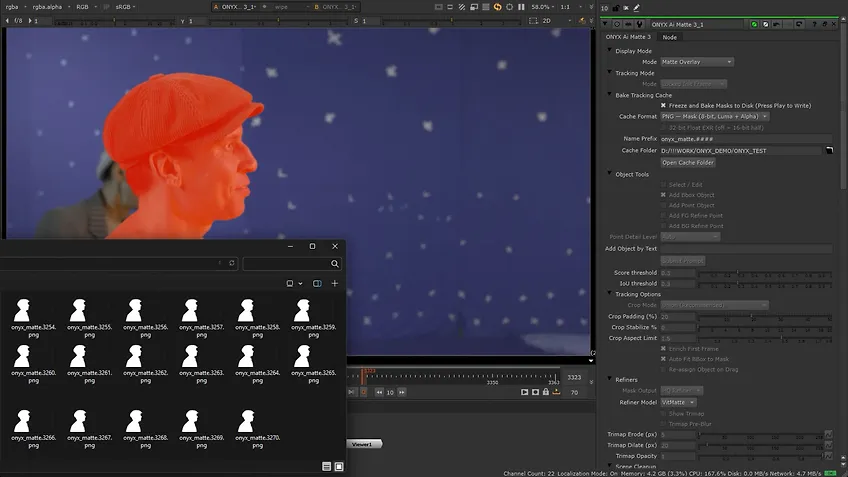
If someone suggests something people actually need and we can realistically build, we discuss it. ONYX is still developing quickly. As the person who started with the original idea, I have no shortage of new ones, and Evgeniy and I are already exploring some of them. It is too early to share details, but there is plenty of work ahead.
How feedback shaped the product
What feedback from artists or studios has had the greatest effect on the product?
How did that feedback change both the workflow and the engineering?
Evgeniy:
We have a group of testers who use ONYX in real work and tell us honestly what they like and what they do not. Lately, to be fair, we have mostly heard good things :)
Go to Init Frame did not exist at first. Testers had to find the state by hand and eventually asked us to add a button that jumped there. So we did.
Then there was the disagreement over Locked Init Frame. The locked mode did not suit everyone, so two options became three: dynamic, static, and no Init Frame at all. Static is the most reliable when a saved project and its tracking need to be restored. Dynamic does not reconstruct that state as precisely. We kept all three because people genuinely work in different ways.
Where a new user should start
What documentation, tutorials, or community resources would you recommend to someone using ONYX for the first time?
What should an artist understand before expecting a good result?
Evgeniy:
Start with the documentation on the site, if only to understand how the product is structured. ONYX does more than it appears to on first launch, and all the inputs are worth learning. Few people notice immediately that they can feed a mask in directly; mask prompt is a powerful input in its own right. Refiner Direct can also accept objects that have already been merged with visible seams and smooth those boundaries.
Full tutorials are planned too, but right now we simply do not have the time to make them. If someone in the community wants to help produce them, I am happy to walk through every part of the plugin and help shape the material. The willingness to share is there; the missing part is hours in the day.
Alexey:
I would not start by looking for the “perfect test shot.” Start by understanding the plugin. The documentation is substantial, that is true, but that knowledge becomes practical very quickly. Without that base, even a simple test can give you the wrong impression of ONYX.
Here is a typical example. A new user selects a person wearing a backpack. SAM3 finds the person and leaves the backpack out because it sees a separate object. The user adds more points, trying to “expand” the person into the backpack, until the model gets confused and starts picking up unrelated areas.
The important distinction is between creating a new object and correcting the one already selected. Add the backpack separately, carry it through the shot, and combine the two masks afterwards. Correction points have another job: restore a missing part of the selected object or remove background that was picked up by mistake.
The refiner deserves separate attention too. Its sliders define the width and depth of the transition zone around the mask. That is where the model looks for a soft edge, partial alpha, motion blur, hair, and fine detail. In effect, the artist tells the refiner how far to look on either side of the original boundary.
For a first exercise, I would use a short shot with a large person and one separate item, such as a backpack. Select the person, create the backpack as a second object, carry both through the shot, and try correction points on a few frames. Then combine the masks and adjust the refiner so you can see for yourself how its working area changes the soft edge and fine detail.
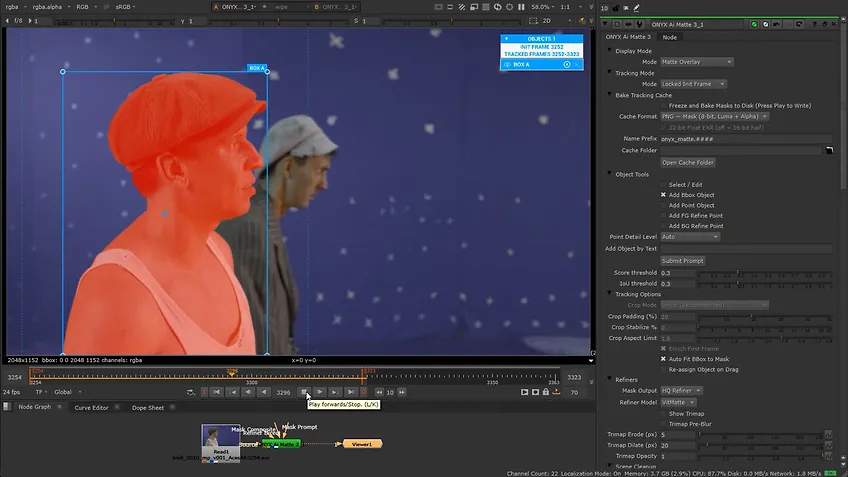
Artists with roto experience usually pick up this logic quickly: a difficult shot still has to be divided into controlled areas. The plugin speeds up the process, but you still need to understand which masks the final result requires and what part of the edge the refiner should analyze.
Roadmap
What can you share about the roadmap for ONYX?
Which priorities come from artists, and which come from engineering constraints or opportunities?
Evgeniy:
We want to address the temporal-memory problem in refiners more broadly. That has become a separate area of development, and it is too early to discuss details. We also want more speed. We have squeezed almost everything out of the current architecture, but new technology may deliver the next performance gain.
Another direction is our own UI outside OFX. The OFX interface holds back a lot of what we could build, and every host supports it differently.
Ideally, ONYX becomes a genuinely one-button tool: press it and get a good mask for any object. We are close in some cases, but not all of them. Another idea is automatic object discovery: point the module at a folder, and it identifies objects in the footage by semantic category, without manual selection. We have plenty of ideas; the OFX interface is often where we hit the ceiling.
Alexey:
Answering this interview helped me put one priority into words: first, understand why a particular mask exists. We have no shortage of ideas for ONYX, but before adding the next feature I want to look more closely at the kinds of masks artists actually use in production.
Of course everyone wants a magic button: press it and get a beautiful, perfect mask. The trouble is that a universal mask does not exist. The word “mask” covers a whole range of jobs, and many of them do not need a perfect object cutout with a perfect edge.
One mask may roughly separate an object, another may restrict despill to the actor's skin, and a third may help recover motion blur or hair. Elsewhere it may be a depth mask or an isolated area for a local lighting adjustment. The longer you work in compositing, the more of these less obvious uses you find. Each one needs different properties.
From the artist's side, I am interested in more than automatic generation. ONYX should help form the right regions, extend them where necessary, and combine specialized masks into a controlled result. In other words, it should account for the purpose of a mask, not only the object inside it.
One idea we are studying is local refiner control over different parts of the same mask. Today one set of controls applies to the whole contour. On a real shot, one section may be a hard clothing edge, the next hair, and the next heavy motion blur. One setting across all three is inevitably a compromise.
The direction is clearer to me now: ONYX should be more than one segmentation button. It should offer flexible ways to work with different masks. Let automation remove the routine, but let the artist decide what each mask is for and how it should be treated.
How AI changes the work
How do you each expect AI to change VFX work?
Which parts of compositing will become less manual, and how will the role of people building these tools change?
Alexey:
When we started ONYX, I was mainly thinking about getting a mask faster. I see it more broadly now: the result is not the mask itself, but a solved shot.
AI tools will take over repetitive mechanical operations and speed up stages that used to take hours by hand. The compositor does not disappear. If anything, the job demands a stronger understanding of the shot: how to divide it into masks, which tool to use, where the automation failed, and when to step in manually.
Speed should not automatically make the work cheaper. It rests on expensive GPUs, software, training, and years of experience. A client is not paying for the number of hours someone sat in front of a monitor. They are paying for a solved problem, responsibility for the result, and the knowledge that made it possible to deliver quickly.
If a new tool helps an artist finish sooner, that is not an automatic reason to cut their rate. Efficiency should be an advantage, not a penalty for knowing how to use the tools well.
What worries me is the habit of measuring only hours while pushing everything toward cheaper and faster delivery. That can devalue the work of both studios and freelancers. If a profession that takes years of training and expensive equipment no longer supports the person doing it, experienced people will leave. At some point, becoming a courier or a plumber may genuinely make more financial sense than working in VFX. That is a very bad outcome for the industry.
As tool builders, we should speed up the routine without hiding professional decisions from the artist. A good AI tool gives people more control and more capability. It does not turn difficult work into a cheap automated service.
Evgeniy:
We set out to remove the routine, and we have removed a lot of it. The work changes with it. The person still has to understand the task, spot the mistake, and know when to stop the automation. The tool should make those decisions faster, not hide them.
I see AI as a positive force for VFX because it speeds up the process. We are still at the beginning. Models are not yet well adapted to limited memory or ordinary consumer GPUs. But development is moving so quickly that compositing, editing, cleanup, and other parts of the job may soon change beyond recognition. It feels like the beginning of a new era for digital film and video.
Where to find the team
Where can readers learn more about ONYX, follow updates, and contact both of you?
For practical discussion and updates join the ONYX Discord Server
We are open to talking. If we do not reply immediately, it usually means we have not caught up yet. We still try to reply to everyone, whether the message comes through support, Discord, or LinkedIn.